Lab 3 – Analyze Your Data (AI & BI)
Once you have prepared the data and have been able to visualize it, you’re ready to take the next logical step: to analyze the data for both Artificial Intelligence and Business Intelligence.
This lab will help you develop analytical graphs and charts along with predictive analytics. You will dabble with the AI models used for the predictions.
- Starting off from the PowerBI dashboard built in the previous lab, you will now add analytical capabilities to the dashboard.
- You will be able to build correlations between various data sets, develop analytical insights, and see the predictions being made by the AI model underneath.
- You will also be exposed to AI model development and model serving abilities of Azure ML
Table of Content
- Objectives
- Getting Started: Set up AutoML training with the Notebook
- Model 1: Crime Type Prediction (ClassificationModel)
- Model 1: Export dataset from SQL Database Connection
- Model 1: Model Training
- Model 1: Testing and Evaluation
- Model 1: Prediction
- Model 2: Time series Model
- Model 2: Export dataset from SQL Database Connection
- Model 2: Training and Prediction
- Take A Quiz and Earn Certificate
Frequently Asked Questions
Machine Learning Studio is a workbench environment you access through a web browser. Machine Learning Studio hosts a pallet of modules with a visual composition interface that enables you to build an end-to-end, data science workflow in the form of an experiment.
By clicking on the output of a module you can visualize the data and get statistics.
Since the data is being transmitted to the browser and may be large, the data size is limited to prevent slowing down Machine Learning Studio. To visualize all the data/result, it’s better to download the data and use Excel or another tool.
Azure Machine Learning supports a wide range of machine learning models, including supervised and unsupervised learning, deep learning, and reinforcement learning. You can build models for tasks such as classification, regression, clustering, and anomaly detection.
Azure Machine Learning supports a variety of programming languages, including Python, R, and SQL. Python is the most commonly used language for machine learning on Azure, and many of the pre-built Azure Machine Learning tools are designed for Python.
Yes, you can bring your own data to Azure Machine Learning. The platform supports a range of data formats, including CSV, Parquet, and JSON. You can also connect to data sources such as Azure Blob Storage, Azure Data Lake Storage, and SQL Server.
Yes, Azure Machine Learning allows you to deploy your models as web services on the cloud. You can deploy models to Azure Kubernetes Service, Azure Container Instances, or Azure Functions.
While it helps to have some experience with machine learning, Azure Machine Learning provides a range of pre-built tools and services that make it accessible to beginners. Additionally, Azure Machine Learning has a large community of users who share resources and best practices.
Sample Certificate
Objectives
This lab will show you how to set up an automated machine learning (AutoML) training job with the Azure Machine Learning Notebook. Automated ML picks an algorithm and hyperparameters for you and generates a model ready for deployment. This lab provides details of the various options that you can use to configure automated ML experiments.
The basic flow diagram for this lab is outlined below. It shows the activities we’ll be performing as part of this lab, starting with exporting the dataset required to train the models from Azure SQL Database, and then building an AI/ML model using Azure ML Studio.
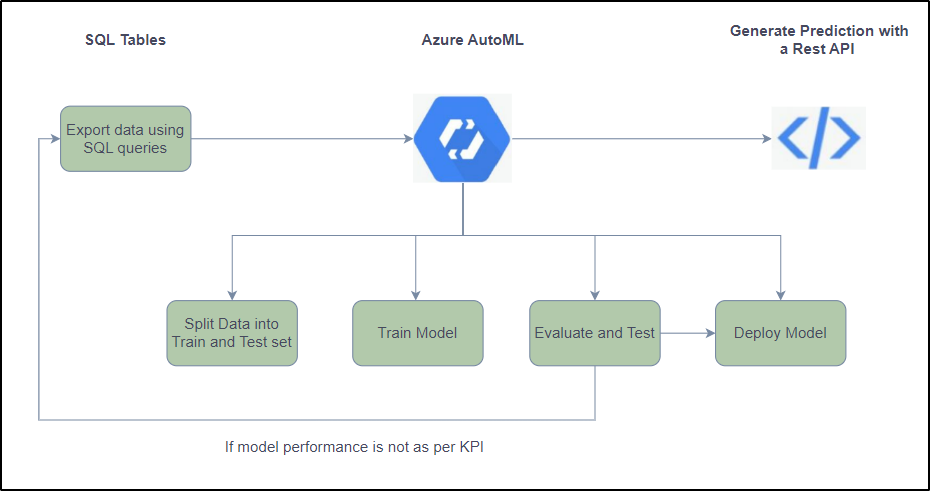
Note: The AI ML models built in this lab are not ready for production; we’re only using 4 years of Chicago Crime data for the model training. Hence, the prediction is done using a python notebook.
Getting Started: Set up AutoML training with the Notebooks
Open your browser and navigate to https://portal.azure.com/
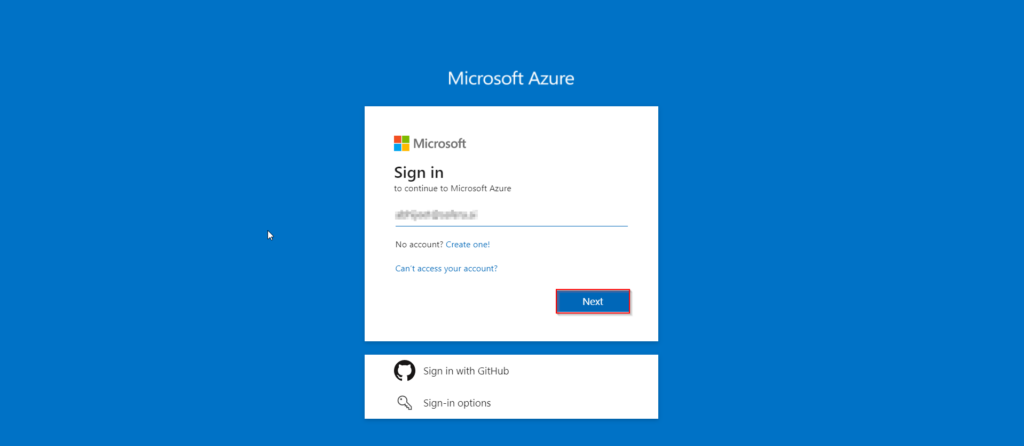
Sign in to Azure portal using your credentials.
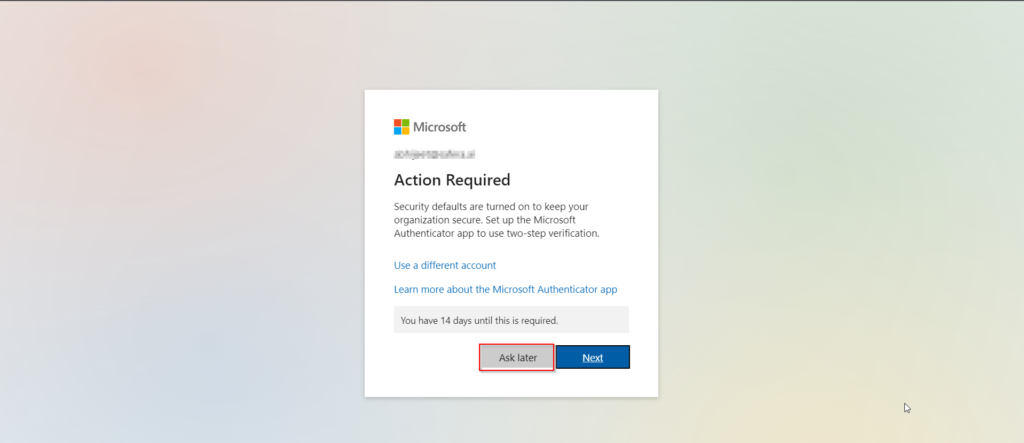
3. You might see a prompt like the one pictured below, Click on Ask Later (Note- Whenever you find this prompt click on the Ask Later option)
4. Once you are signed in to azure portal, click on the Resourse groups tab, to select the required resourse.
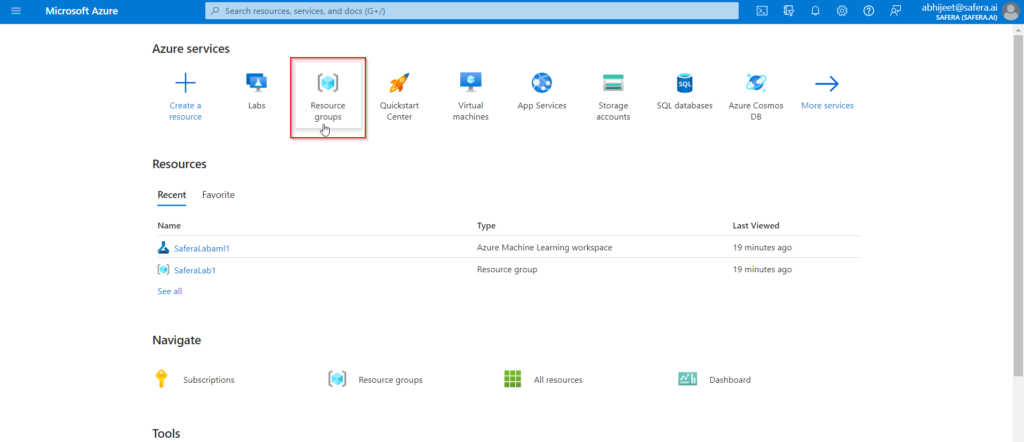
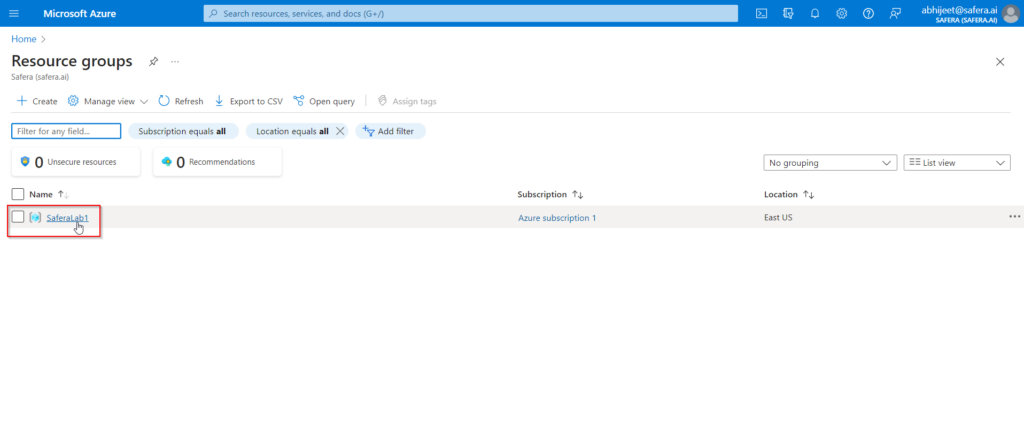
5. Select the SaferaLab1 resourse group.
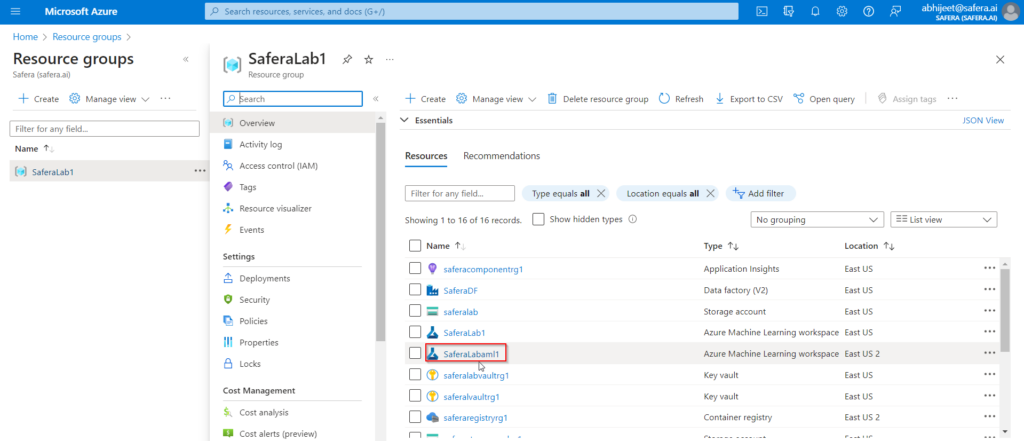
6. Once you’ve selected the SaferaLab1 Resource group, select the SaferaLabaml1 workspace from the list. If you’re having difficulty finding it you can type “workspace” into the “Filter for any field” input and you’ll only be shown workspace resources.
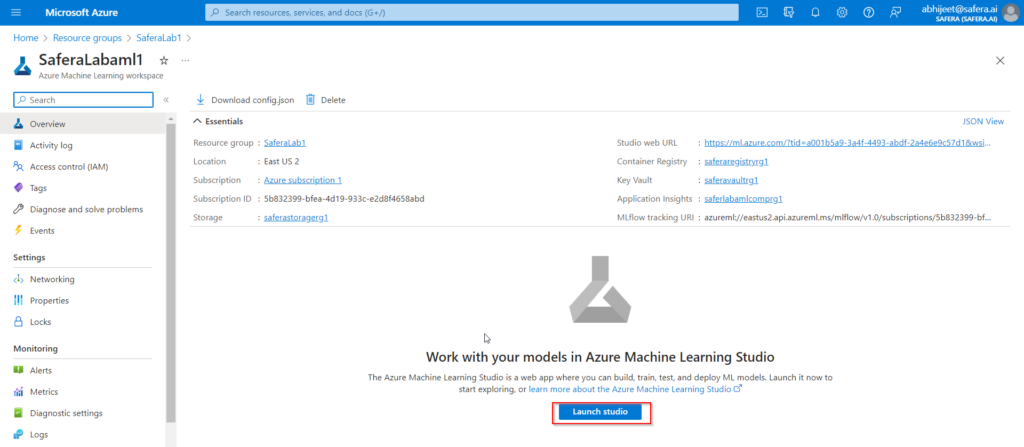
7. Once you’re in the SaferaLabaml1 workspace, you can click on “Launch Studio” towards the bottom of the screen. It will open up a new tab in your browser.
8. Navigate to the left pane. Select Notebooks under the Author section.
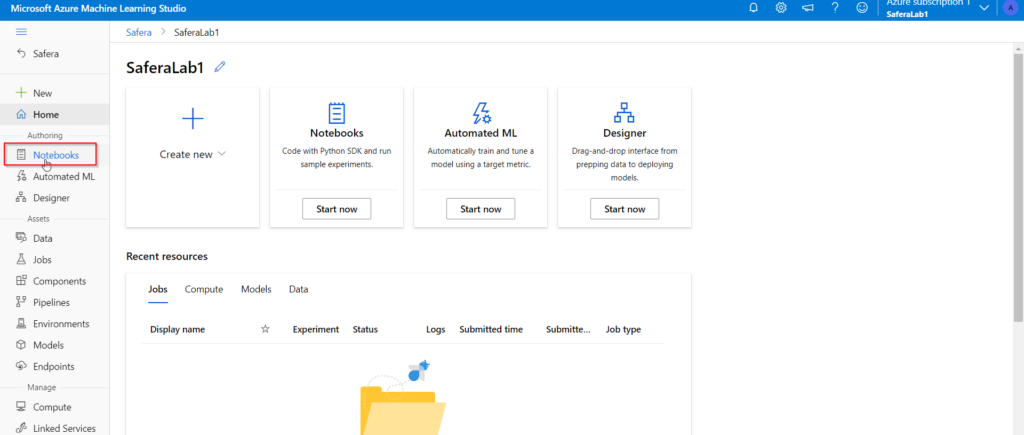
Model 1 : Crime Type Prediction (ClassificationModel)
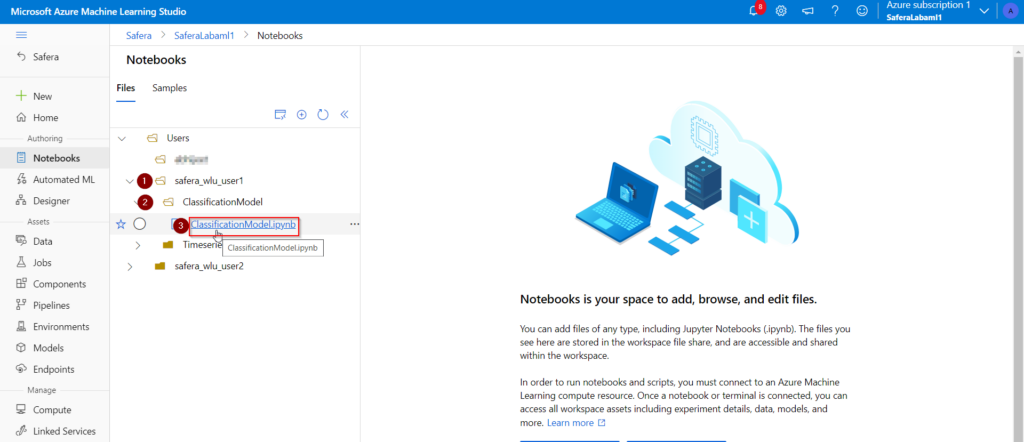
- Open the Notebook file as follow :
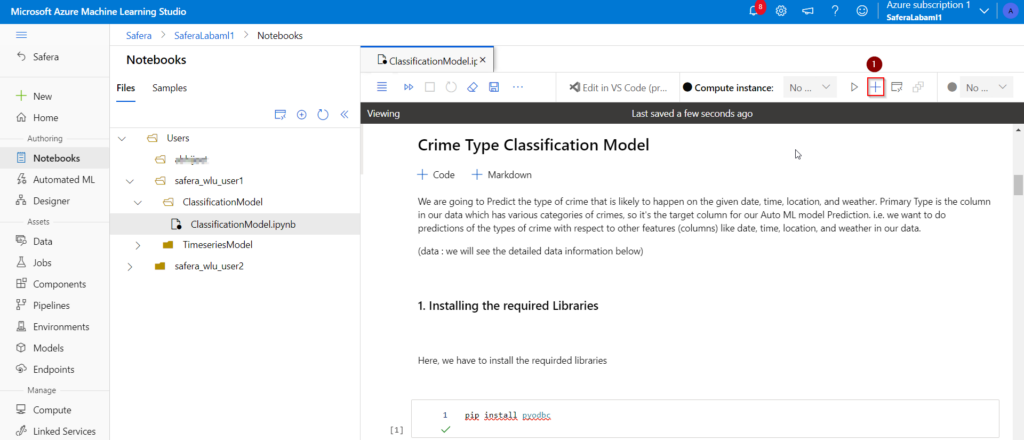
- Once you open the Notebook file, Click on the + button present at right side as shown in the image to create a compute instance.
- Fill the Configure required settings
- Give the compute name as saferalab compute
- Select the virtual Machine Size
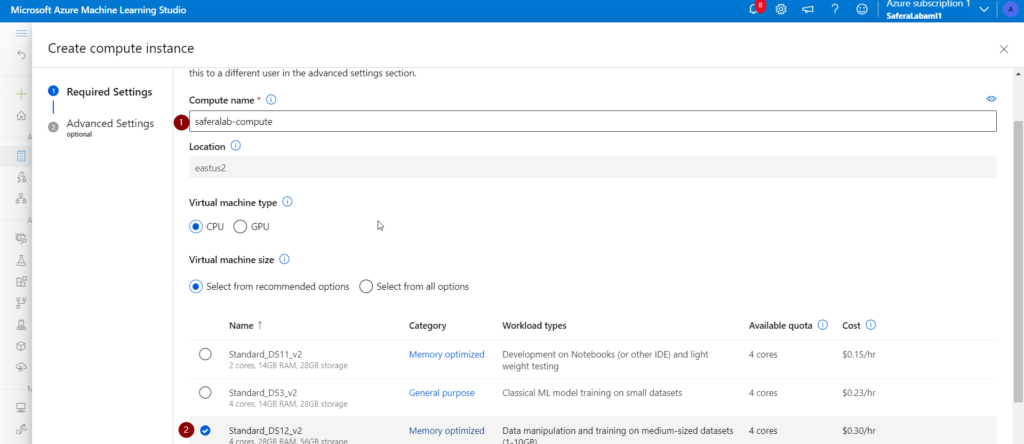
- Click on the Create button
- It will take few minutes(3-5) to create a compute instance.
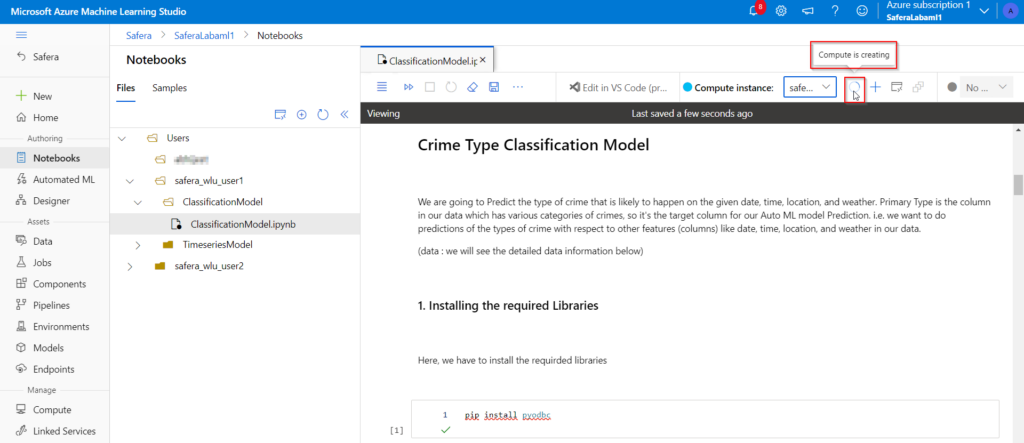
- Once the compute created, you can see the created compute instance in green colour.
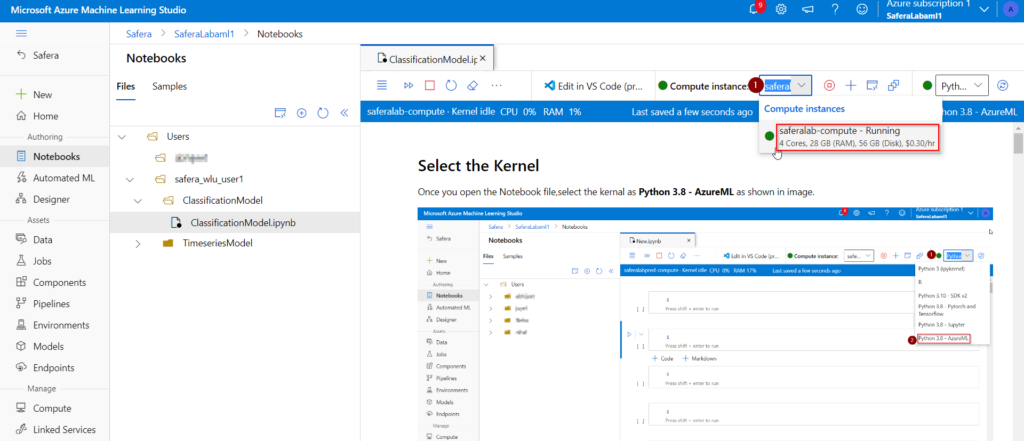
(if asks for authentication permission, click on the Authenticate button)
3. Select the kernal as Python 3.8 – AzureML as shown in image.
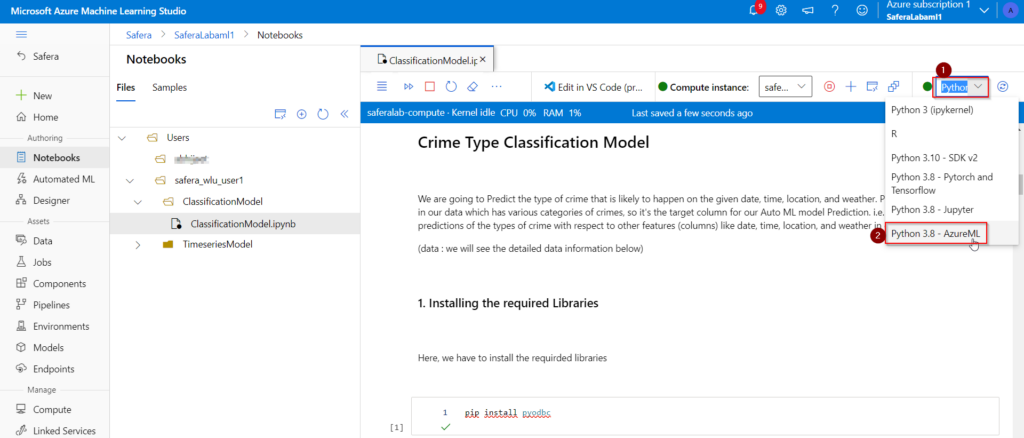
4. Instructions to run the cell – Click on the first cell
- Shift+Enter : Runs the current cell and select the cell below it or
- Ctrl+Enter : Runs the current cell. or
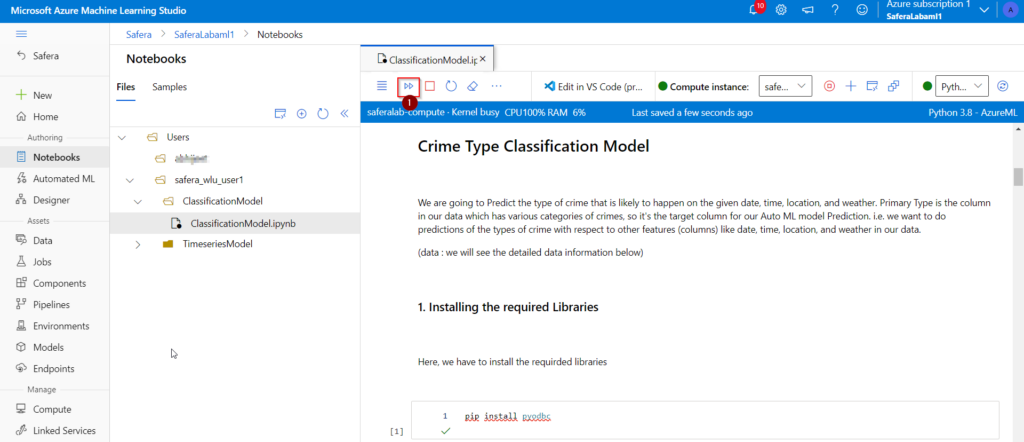
- Click on the icon as shown in image : To run all cell at once
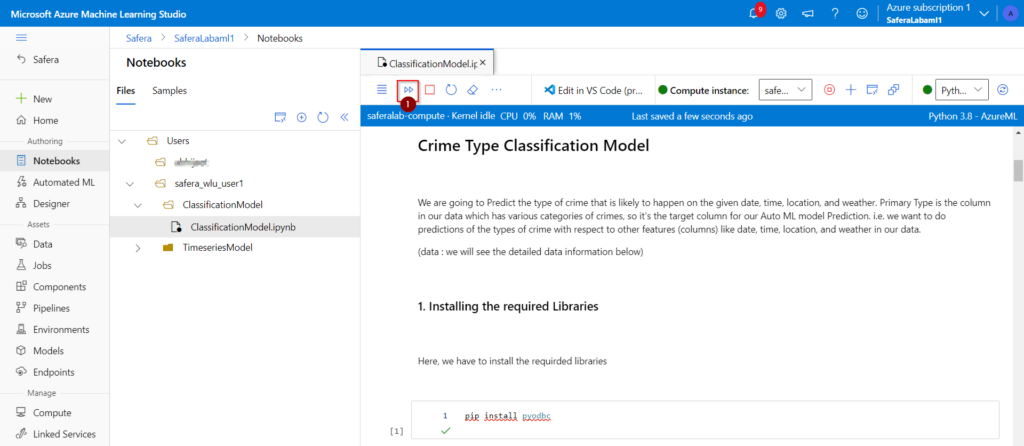
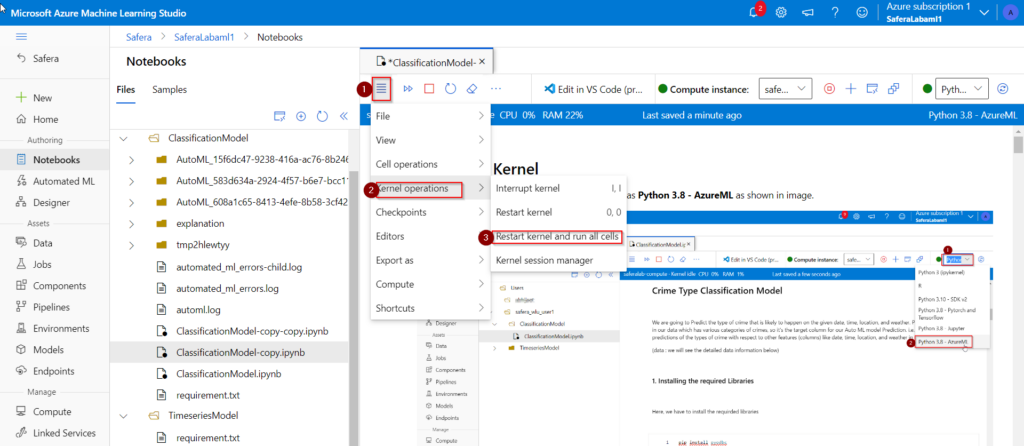
5. So, Click on the “Restart kernal and run all cells” button. This will run all the cells in the notebook.
if you didn’t find that icon, then you can use this method to “Restart kernal and run all cells”
Model 1: Export dataset from SQL Database Connection
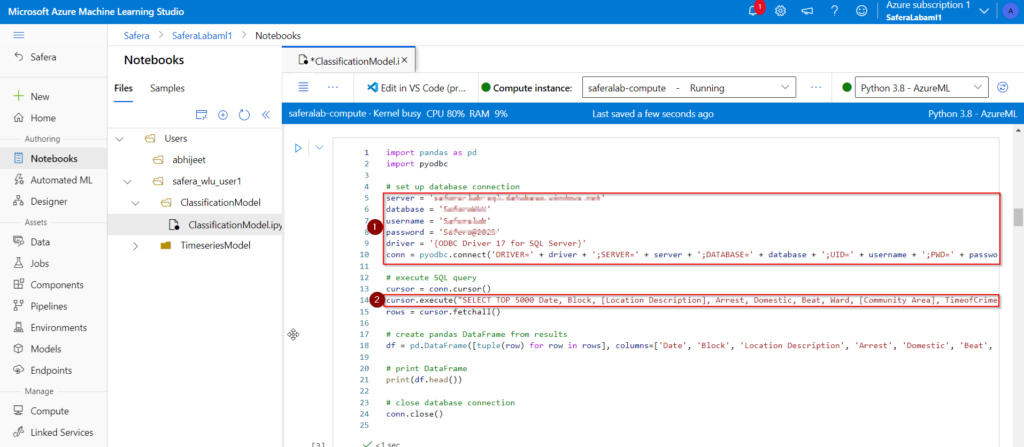
from above image
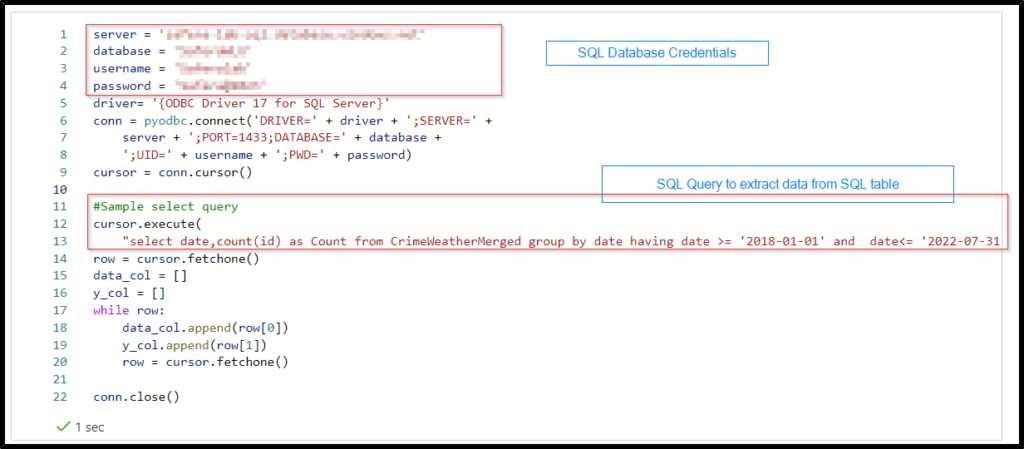
- SQL Database credentials
- Query to get required data
Data information
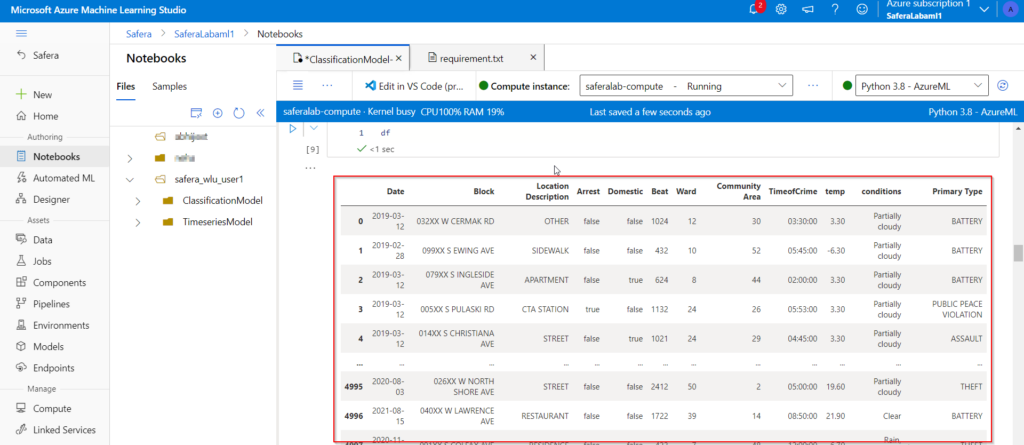
- Date: For which we need to see the prediction.
- Block : The partially redacted address where we need to look for the possibility of a happening crime.
- Description of the location: For Instance – Residence, Sidewalk, Apartment, Residence, Grocery Food Store, Street.
- Arrest : Indicates whether an arrest was made.
- Domestic: Indicates whether the incident is domestic-related as defined by the Illinois Domestic Violence Act.
- Beat: Indicates the beat where the incident occurred. A beat is the smallest police geographic area – each beat has a dedicated police beat car. Three to five beats make up a police sector, and three sectors make up a police district.
- Ward: City Council District
- Community Area: Indicates the community area where the incident occurred. For instance: Chicago has 77 community areas.
- Time of the Crime
- Average Temperature of the location
- conditions : Weather condition
- Primary Type (Target Column) : Type of crime ex. BATTERY,THEFT,PUBLIC PEACE VIOLATION,ASSAULT etc
Model 1: Training
- Here, we are training the Model using Azure AutoML library. (Automatic Machine Learning will take 18-22 minutes for its completion)
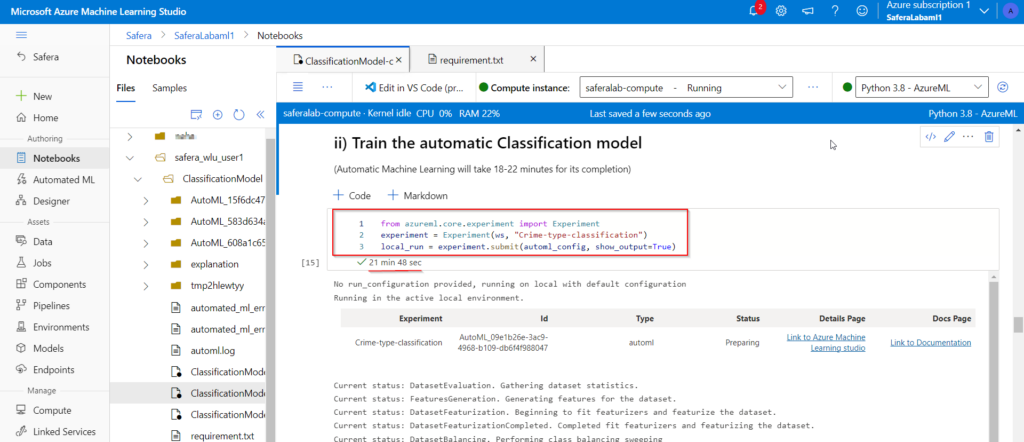
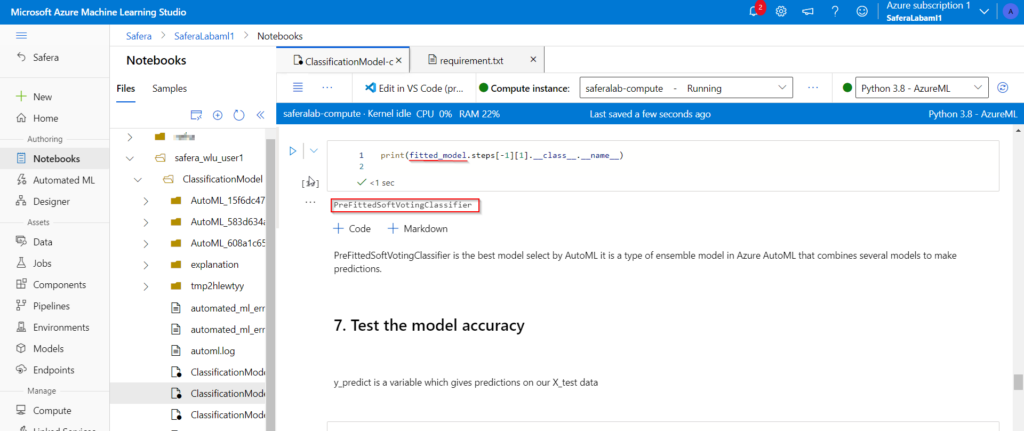
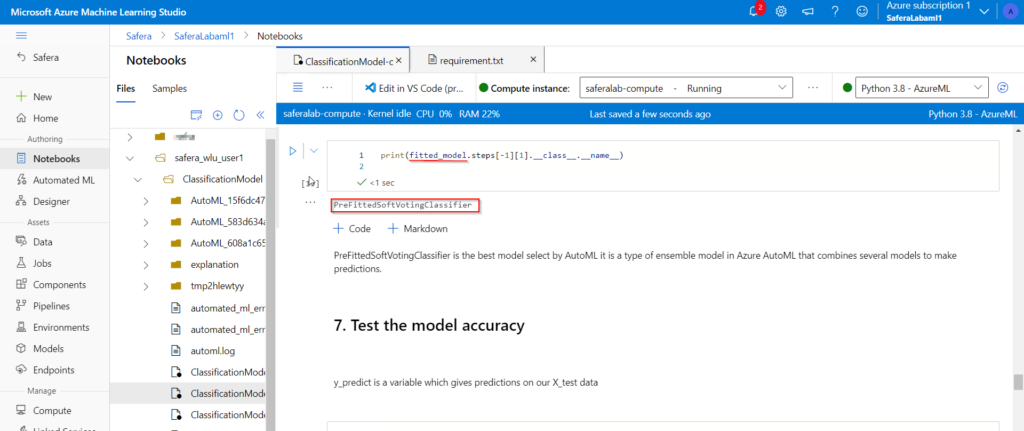
- After the model Training completes, we will get our best model with variable name fitted_model.
Model 1: Testing and Evaluation
- Using the best model i.e. fitted_model, we will do predictions for test data. y_predict is a variable which gives predictions on our X_test data.
- We will Evaluate the model Accuracy metrics for the predictions on the test data.
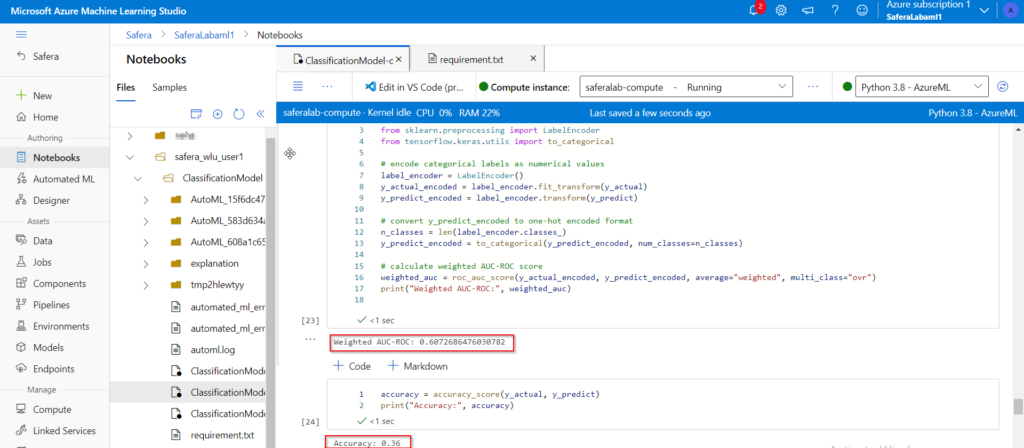
Weighted AUC-ROC & Accuracy are the accuracy metrics used for testing the model here.
Model 1: Prediction
here we will pass the input values for-
1. Date
2. Block
3. Description of the location
4. Arrest
5. Domestic
6. Beat
7. Ward
8. Community Area
9. Time of the Crime
10. Average Temperature of the location
11. conditions
And will do the predictions for
12. Primary Type (Target Column) : Type of crime ex. BATTERY,THEFT,PUBLIC PEACE VIOLATION,ASSAULT etc
Case1
- input values are as follows date_val = “2023-5-16” block_val = “032XX W CERMAK RD” loc_val = “OTHER” arrest_val = “TRUE” domestic_val = “FALSE” beat_val = “1024” ward_val = “12” community_val = “30” time_val = “12:30:00” temp_val = “3.30” weather_val = “Partially cloudy”
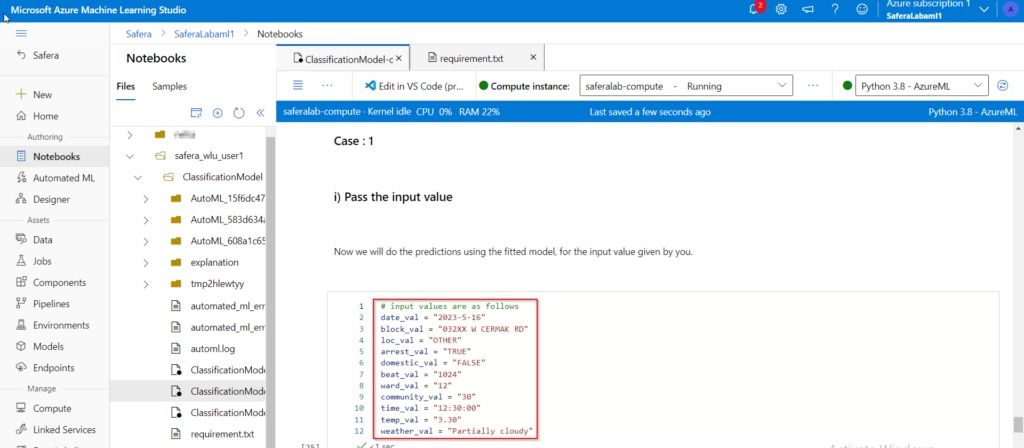
we get the result for case 1 as ‘THEFT’
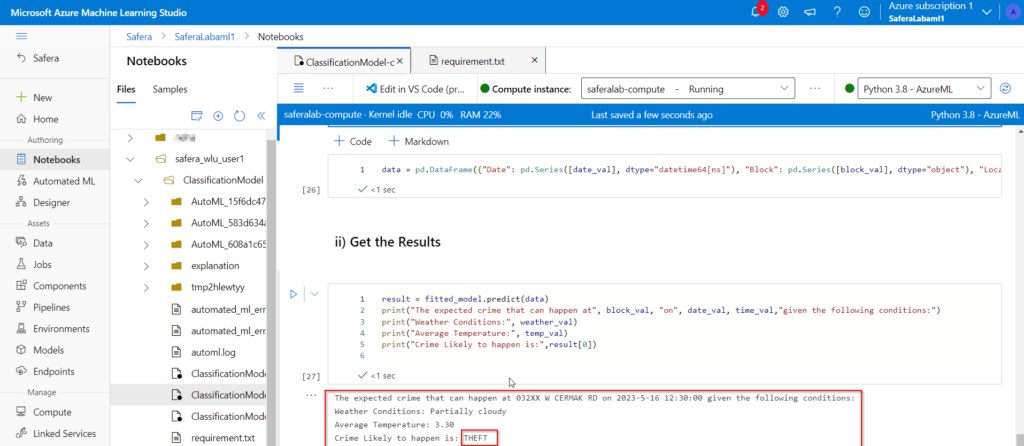
You can change the input to get the another predictions, lets do the predictions for case 2, with changed inputs.
Case2
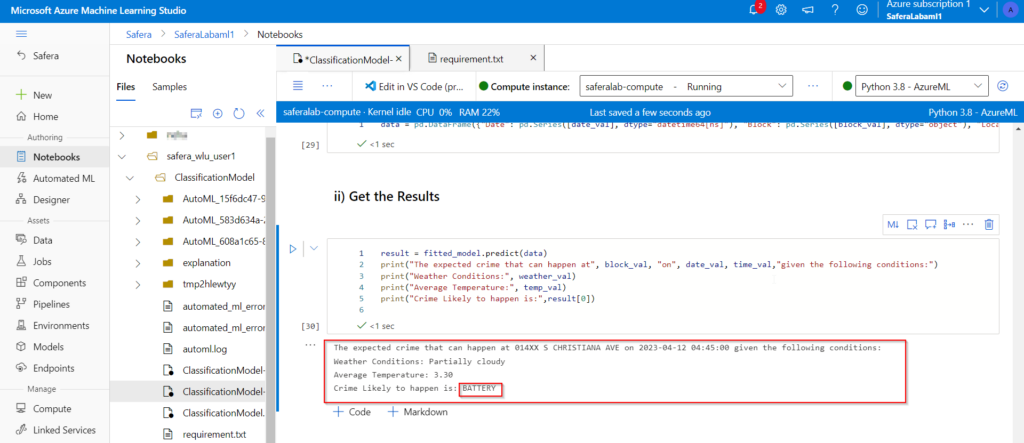
- input values are as follows date_val = “2023-04-12” block_val = “014XX S CHRISTIANA AVE” loc_val = “STREET” arrest_val = “false” domestic_val = “true” beat_val = “1021” ward_val = “24” community_val = “29” time_val = “04:45:00” temp_val = “3.30” weather_val = “Partially cloudy”
we get the result for case 2 as ‘BATTERY’
Model 2: Time series Model
A time series model is created to predict the frequency of crime that can happen in the future. The algorithm used to achieve the objective is Skforecast. Skforecast is a simple open-source Python package for time series forecasting. It provides a simple and intuitive API to create and fit forecasting models using machine learning algorithms such as ARIMA, SARIMA, exponential smoothing, and random forests.
Under the notebook section. Navigate to the “TimeseriesModel” folder inside your user.
Open the “SkforecastModel.ipynb” file.
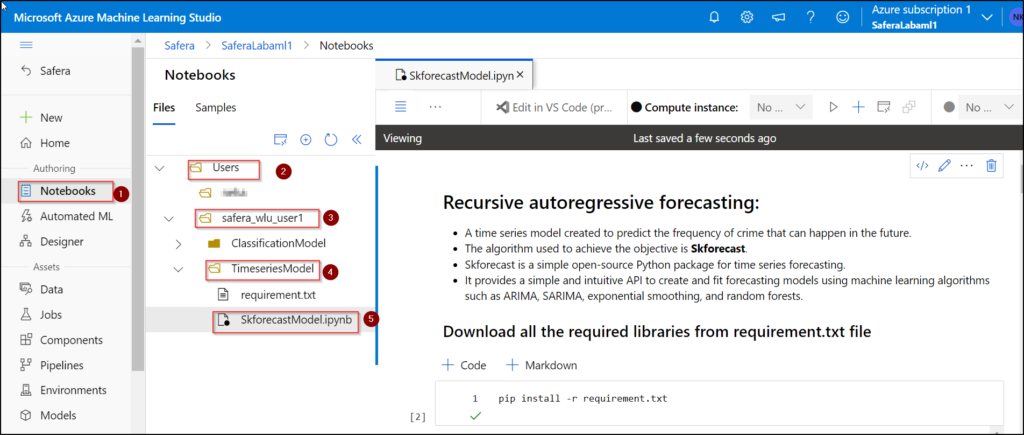
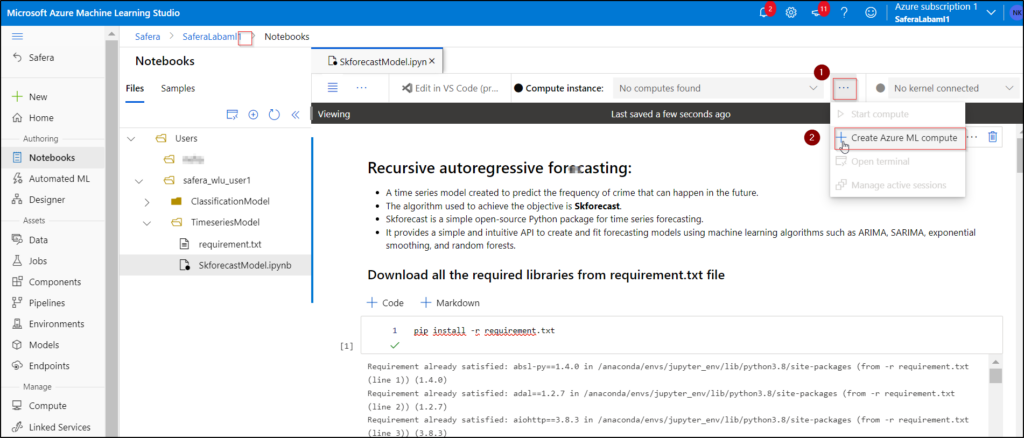
3. Click on the three dots as shown in the screenshot and create a new Azureml compute instance.
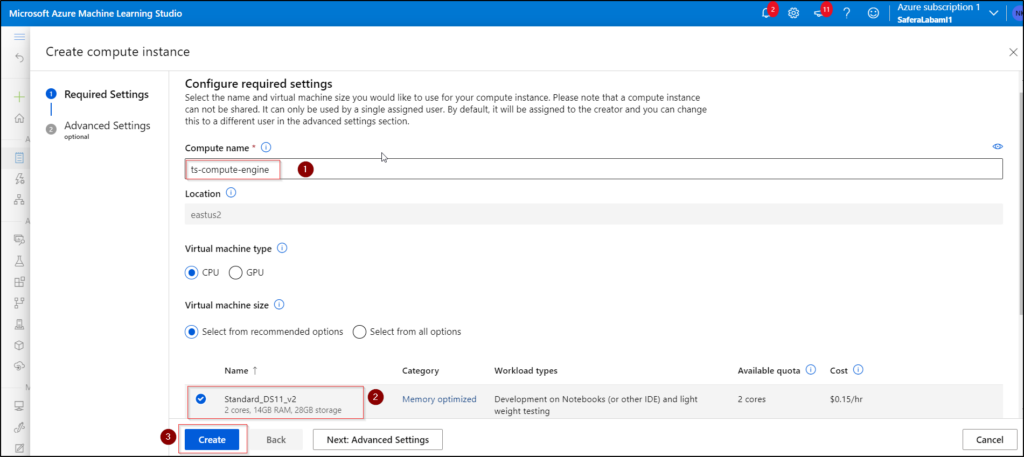
4. Write a compute name and select the computing machine. Finally, click on create. (If the computing machine is already available and created in model 1, then please skip steps 4 and 5).
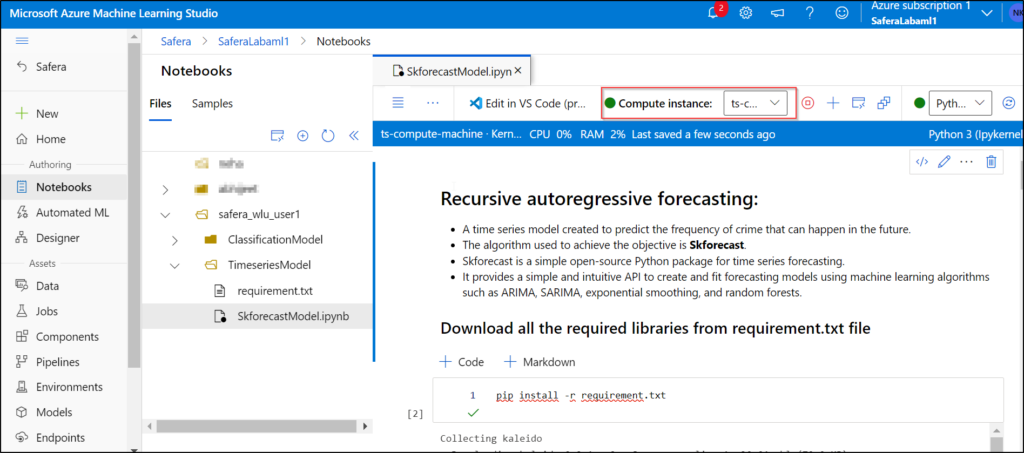
5. You can see a computing instance starting up. Wait till it turns in green colour.
6. Select the kernal as Python 3 (ipykernel) as shown in image.
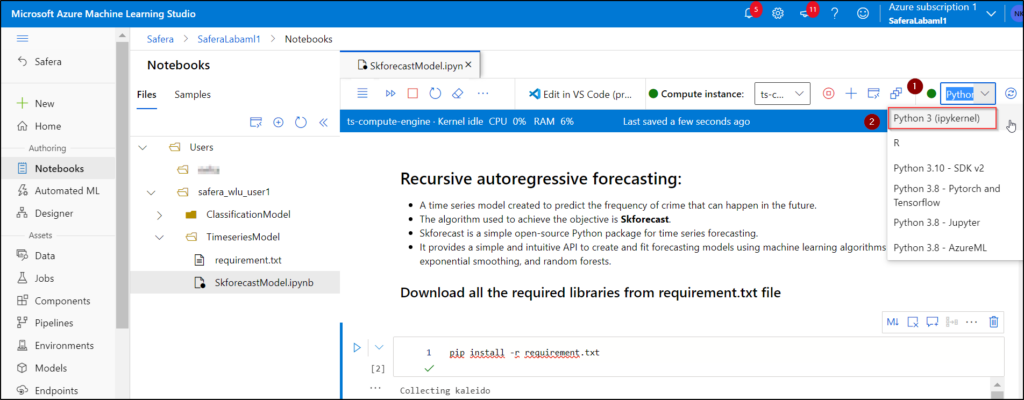
7. Click on the “Restart kernal and run all cells” button. This will run all the cells in the notebook.
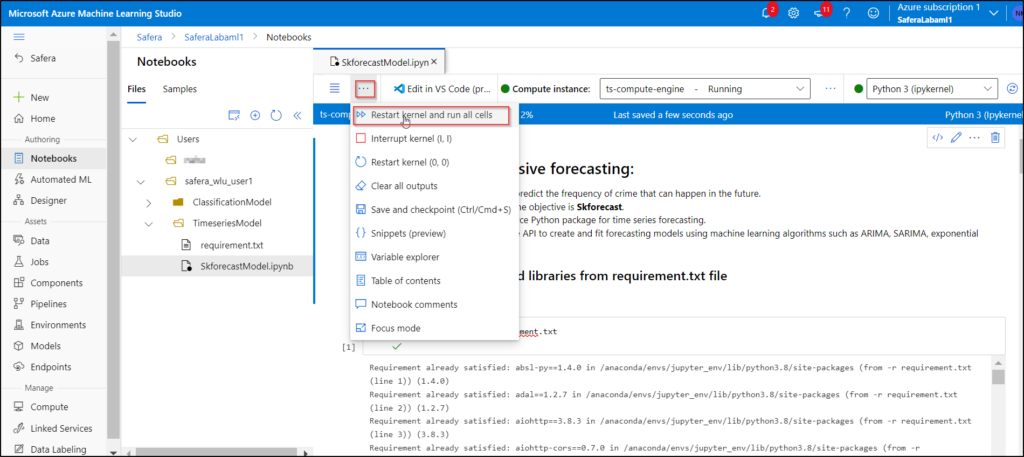
8. This saves the prediction values in a CSV and shows the trend as below:
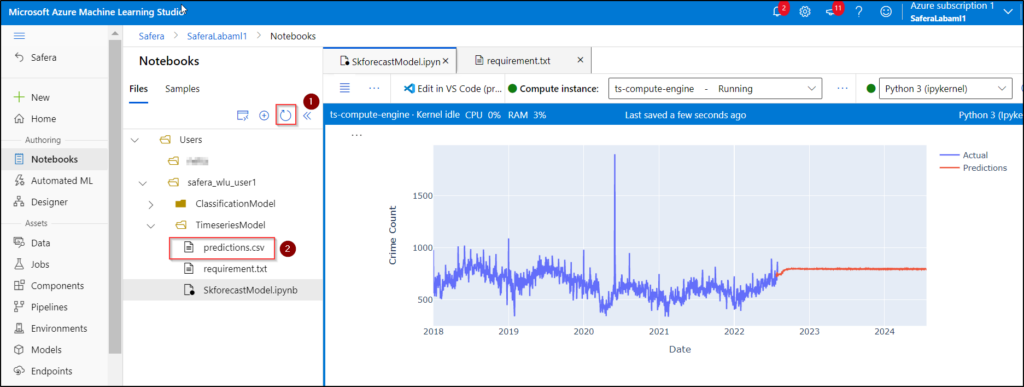
NOTE: To run the individual cells, please click the cell that you want to run and then press shift+enter (Make sure you run all the cells above that cell as well).
Model 2: Export dataset from SQL Database Connection
- Code snippet to establish a SQL database connection and export data from a SQL table.
Model 2: Training and Prediction
Model Training:

Test Results:
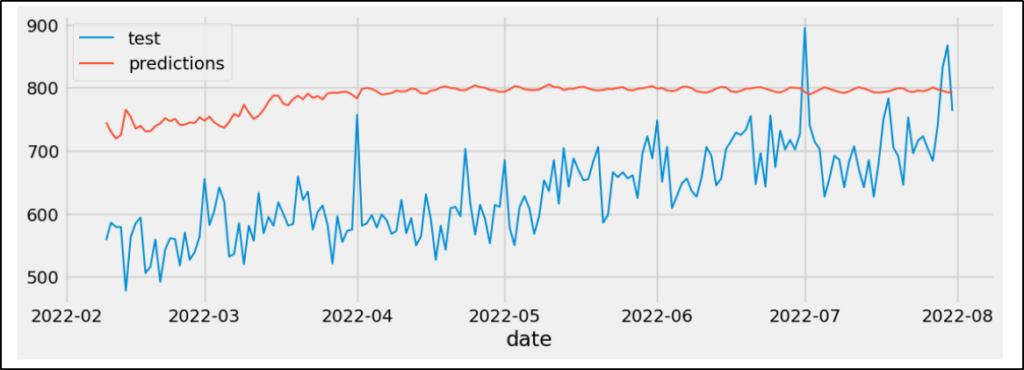
Prediction: Please provide the future date to the date_val variable. The prediction will be saved till the given future date. For instance, in the given screenshot a prediction result is shown for 2 years (from July 23, 2022, to July 23, 2024) as date_val = “2024-07-23”.


